

Introduction to Ombre Chocolate Cake Recipe
What is an Ombre Chocolate Cake?
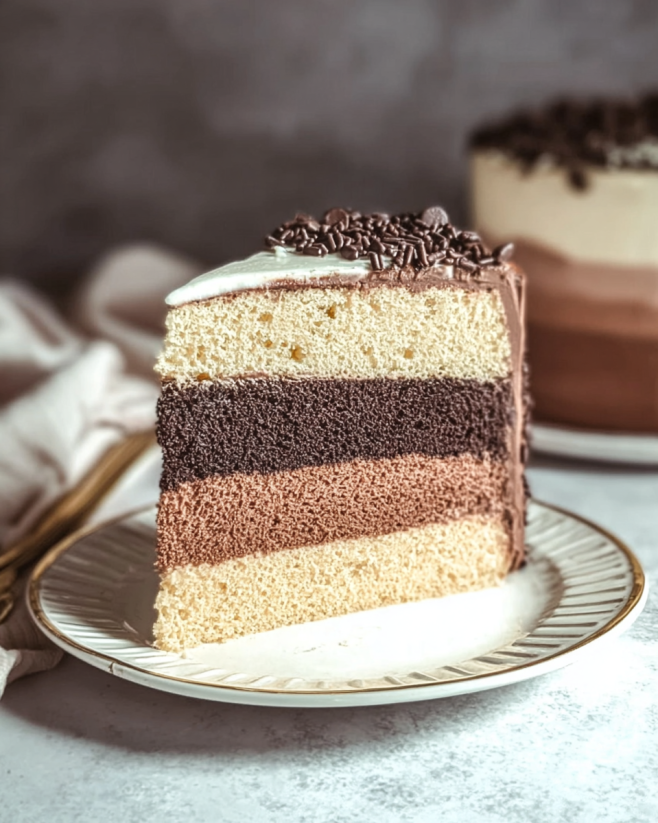
An Ombre Chocolate Cake is a delightful dessert that features layers of chocolate cake in varying shades of color. The term “ombre” refers to the gradual blending of one color hue to another, creating a beautiful visual effect. In this cake, the colors transition from dark chocolate at the bottom to a lighter shade at the top. This stunning appearance makes it a showstopper for any celebration, whether it’s a birthday, wedding, or just a special treat for yourself.
Why You Should Try This Ombre Chocolate Cake Recipe
There are many reasons to try this Ombre Chocolate Cake Recipe. First, it combines rich chocolate flavor with a fun and colorful presentation. The layers not only look amazing but also provide a delightful taste experience. Each bite offers a different intensity of chocolate, making it exciting for your taste buds.
Moreover, this recipe is straightforward and perfect for bakers of all skill levels. With simple ingredients and easy-to-follow steps, you can create a cake that impresses your family and friends. Plus, the ombre effect allows for creativity. You can choose your favorite shades or even experiment with different colors to match your party theme.
Lastly, this cake is versatile. You can customize it with various frostings and fillings, making it suitable for any occasion. So, gather your ingredients and get ready to bake a cake that not only tastes delicious but also looks stunning!
Ingredients for Ombre Chocolate Cake Recipe
To create a delicious Ombre Chocolate Cake, you’ll need a selection of simple yet essential ingredients. Here’s what you’ll need:
- 2 cups all-purpose flour
- 1 ¾ cups granulated sugar
- ¾ cup unsweetened cocoa powder
- 2 teaspoons baking powder
- 1 ½ teaspoons baking soda
- 1 teaspoon salt
- 2 large eggs
- 1 cup whole milk
- ½ cup vegetable oil
- 2 teaspoons vanilla extract
- 1 cup boiling water
- 1 cup chocolate frosting (store-bought or homemade)
- 1 cup vanilla frosting (store-bought or homemade)
- Food coloring (optional, for ombre effect)
These ingredients come together to create a moist and flavorful cake. The combination of cocoa powder and sugar gives the cake its rich chocolate flavor, while the eggs and milk ensure a tender crumb. The baking powder and baking soda help the cake rise beautifully, making it light and fluffy.
If you want to add a twist to your cake, consider using brewed coffee instead of half the boiling water. This substitution enhances the chocolate flavor, making it even richer. For those looking for a lighter option, you can use a sugar substitute and low-fat frosting. This way, you can enjoy a delicious dessert without the guilt!
Gather these ingredients, and you’ll be well on your way to creating a stunning Ombre Chocolate Cake that will impress everyone at your next gathering!
Step-by-Step Preparation of Ombre Chocolate Cake Recipe
Step 1: Preparing the Cake Batter
To start, gather all your ingredients on a clean countertop. In a large mixing bowl, combine the all-purpose flour, granulated sugar, cocoa powder, baking powder, baking soda, and salt. Use a whisk to mix these dry ingredients thoroughly. This step is crucial as it ensures that the leavening agents are evenly distributed throughout the batter.
Next, add the eggs, whole milk, vegetable oil, and vanilla extract to the dry mixture. Beat the mixture on medium speed for about two minutes. This process helps to incorporate air into the batter, making your cake light and fluffy. After that, carefully stir in the boiling water. The batter will be quite thin, but that’s perfectly normal. This thin consistency helps the cake layers stay moist and tender.
Step 2: Baking the Cake Layers
Now that your batter is ready, it’s time to bake! Divide the batter evenly into three separate bowls. If you’re using food coloring, add a different shade to each bowl. You can choose dark, medium, and light shades to create that beautiful ombre effect.
Pour each colored batter into the prepared 9-inch round cake pans. Make sure to spread the batter evenly in each pan. Bake the cakes in your preheated oven at 350°F (175°C) for 30 to 35 minutes. To check if they are done, insert a toothpick into the center of each cake. If it comes out clean, your cakes are ready!
Step 3: Making the Ombre Frosting
While the cakes are baking, you can prepare the frosting. If you’re using store-bought frosting, you can skip this step. However, if you prefer homemade frosting, whip up a batch of chocolate frosting and a batch of vanilla frosting. For the ombre effect, you can tint the vanilla frosting with food coloring to match the shades of your cake layers.
To create a smooth and creamy texture, beat the frosting until it’s fluffy. This will make it easier to spread between the layers and on the outside of the cake.
Step 4: Assembling the Ombre Chocolate Cake
Once the cakes have cooled completely, it’s time to assemble your masterpiece! Start by placing the darkest layer on a serving plate. Spread a generous layer of chocolate frosting on top. Then, add the medium layer and repeat the process. Finally, place the lightest layer on top.
After stacking the layers, cover the entire cake with chocolate frosting. This will create a beautiful base for your ombre effect. Make sure to smooth the frosting out as much as possible for a polished look.
Step 5: Decorating the Cake
Now comes the fun part—decorating! You can use the tinted vanilla frosting to create an ombre effect on the outside of the cake. Start at the bottom with the darkest shade and gradually transition to the lightest shade at the top. Use a spatula or a piping bag to achieve the desired look.
Feel free to add sprinkles, chocolate shavings, or fresh fruit on top for an extra touch. Once you’re satisfied with your decoration, chill the cake for at least 30 minutes. This will help the frosting set and make it easier to slice when serving.
Variations of Ombre Chocolate Cake Recipe
Different Flavor Combinations
While the classic Ombre Chocolate Cake is a delightful treat, you can easily switch things up with different flavor combinations. For instance, consider using a vanilla or almond cake base instead of chocolate. This will give you a lighter flavor that pairs beautifully with fruity frostings.
Another exciting option is to incorporate different extracts into your batter. For example, adding orange or lemon extract can create a refreshing citrus twist. You can also experiment with spices like cinnamon or nutmeg for a warm, cozy flavor. If you want to go all out, try a red velvet cake base for a stunning visual and taste experience.
For a more decadent version, consider adding chocolate chips or chunks to the batter. This will give your cake an extra chocolatey surprise in every bite. You can also layer in fruit preserves or whipped cream between the cake layers for added flavor and texture. The possibilities are endless, so feel free to get creative!
Alternative Frosting Options
Frosting is a key element of any cake, and there are many options to choose from for your Ombre Chocolate Cake. While chocolate and vanilla frostings are classic choices, you can explore other flavors to match your cake’s theme.
For a fruity twist, consider using a strawberry or raspberry frosting. These flavors can add a refreshing contrast to the rich chocolate layers. Cream cheese frosting is another excellent option, offering a tangy flavor that complements the sweetness of the cake.
If you’re looking for a lighter option, whipped cream frosting is a fantastic choice. It’s airy and fluffy, making it perfect for a summer gathering. You can also try a ganache made from melted chocolate and heavy cream for a rich, glossy finish.
Don’t forget about the option of using a combination of frostings! You can layer chocolate and vanilla frostings for a beautiful two-tone effect. This not only enhances the visual appeal but also adds depth to the flavor profile. Whatever frosting you choose, make sure it complements the cake layers for a deliciously harmonious dessert.
Cooking Note for Ombre Chocolate Cake Recipe
When preparing your Ombre Chocolate Cake, there are a few important cooking notes to keep in mind. These tips will help ensure that your cake turns out perfectly every time.
First, always preheat your oven before baking. This step is crucial as it helps the cake rise evenly. If the oven isn’t hot enough, your cake may not bake properly, leading to a dense texture.
Next, make sure to grease and flour your cake pans thoroughly. This prevents the cake from sticking to the pans, making it easier to remove them once baked. You can also use parchment paper at the bottom of the pans for added assurance.
When mixing your batter, avoid overmixing. While it’s important to combine the ingredients well, overmixing can lead to a tough cake. Mix just until everything is combined and smooth.
As you bake, keep an eye on the cakes. Ovens can vary in temperature, so check for doneness a few minutes before the recommended baking time. Insert a toothpick into the center of the cake; if it comes out clean or with a few moist crumbs, your cake is ready.
After baking, allow the cakes to cool in the pans for about 10 minutes. This helps them set and makes them easier to remove. Then, transfer them to wire racks to cool completely. Cooling is essential for achieving the right texture and flavor.
Lastly, when frosting your cake, ensure that the layers are completely cool. If the cake is warm, the frosting may melt and slide off, ruining your beautiful ombre effect. Patience is key here!
By following these cooking notes, you’ll be well on your way to creating a stunning and delicious Ombre Chocolate Cake that will impress everyone!
Serving Suggestions for Ombre Chocolate Cake Recipe
Once your Ombre Chocolate Cake is beautifully assembled and decorated, it’s time to think about how to serve it. This cake is not only a feast for the eyes but also a delight for the taste buds. Here are some serving suggestions to enhance your cake experience:
- Slice with Care: Use a sharp knife to cut even slices. This will help maintain the beautiful layers and ombre effect. Wipe the knife with a damp cloth between cuts for clean edges.
- Pair with Ice Cream: Serve each slice with a scoop of vanilla or chocolate ice cream. The cold creaminess complements the rich chocolate layers perfectly.
- Add Fresh Fruit: Fresh berries, such as strawberries or raspberries, can add a refreshing contrast to the sweetness of the cake. Place a few on the plate alongside each slice for a pop of color.
- Drizzle with Sauce: Consider drizzling chocolate or caramel sauce over the cake slices. This adds an extra layer of flavor and makes the presentation even more appealing.
- Garnish with Whipped Cream: A dollop of whipped cream on top of each slice can enhance the cake’s richness. You can also sprinkle some cocoa powder or chocolate shavings for added flair.
- Serve with Coffee or Tea: Pairing your cake with a warm cup of coffee or tea can elevate the dessert experience. The warmth of the drink balances the sweetness of the cake.
These serving suggestions will not only make your Ombre Chocolate Cake look even more inviting but also enhance the overall flavor experience. Whether it’s a birthday party, a family gathering, or just a cozy night in, this cake is sure to impress your guests and leave them wanting more!
Tips for Perfecting Your Ombre Chocolate Cake Recipe
Creating the perfect Ombre Chocolate Cake is an art that combines technique, patience, and a little creativity. Here are some valuable tips to help you achieve a stunning and delicious cake that will wow your guests:
- Use Room Temperature Ingredients: Before you start baking, make sure your eggs and milk are at room temperature. This helps the ingredients blend more easily, resulting in a smoother batter.
- Measure Ingredients Accurately: Baking is a science, so precise measurements are crucial. Use a kitchen scale for the best accuracy, especially for flour and sugar.
- Don’t Skip the Sifting: Sifting your dry ingredients, especially the cocoa powder, helps to remove lumps and aerate the mixture. This step contributes to a lighter cake texture.
- Experiment with Colors: When adding food coloring, start with a small amount and gradually increase until you reach your desired shade. This way, you can control the intensity of the colors.
- Cool Cakes Completely: Allow your cake layers to cool completely before frosting. If they are even slightly warm, the frosting can melt and slide off, ruining your beautiful ombre effect.
- Use a Cake Leveler: To ensure even layers, consider using a cake leveler or a serrated knife to trim the tops of your cakes. This will help them stack neatly and look professional.
- Chill Between Layers: After stacking and frosting each layer, chill the cake for about 15 minutes before adding the next layer. This helps the frosting set and keeps the layers stable.
- Practice Your Frosting Technique: If you’re new to frosting, practice on a piece of parchment paper first. This will help you get comfortable with the spatula or piping bag before decorating your cake.
- Store Properly: If you have leftovers, store the cake in an airtight container at room temperature for up to three days. If you need to keep it longer, refrigerate it, but allow it to come to room temperature before serving.
By following these tips, you’ll be well on your way to mastering the Ombre Chocolate Cake Recipe. Each step you take will bring you closer to creating a cake that not only looks beautiful but also tastes incredible. Happy baking!
Breakdown of Time for Ombre Chocolate Cake Recipe
Prep Time
Preparing your Ombre Chocolate Cake is an exciting process! The prep time for this recipe is approximately 30 minutes. During this time, you will gather all your ingredients, mix the batter, and divide it into different bowls for coloring. Make sure to take your time to measure everything accurately. This will ensure a delicious outcome!
Cooking Time
Once your batter is ready, it’s time to bake! The cooking time for the cake layers is about 30 to 35 minutes. Keep an eye on the cakes as they bake. You can check for doneness by inserting a toothpick into the center. If it comes out clean, your cakes are ready to cool!
Total Time
In total, you can expect to spend around 1 hour and 5 minutes to 1 hour and 10 minutes on this Ombre Chocolate Cake Recipe. This includes both prep and cooking time. After baking, don’t forget to allow the cakes to cool completely before frosting. This cooling period is essential for achieving the perfect texture and flavor.
With this time breakdown, you can plan your baking session effectively. Enjoy the process, and soon you’ll have a stunning Ombre Chocolate Cake to share with family and friends!
Nutritional Information for Ombre Chocolate Cake Recipe
Calories
When indulging in a slice of Ombre Chocolate Cake, it’s good to be aware of the calories you’re consuming. Each serving contains approximately 350 calories. This number can vary slightly based on the specific ingredients and portion sizes you use. While this cake is a treat, enjoying it in moderation is key to maintaining a balanced diet.
Protein
In addition to its delicious taste, this cake also provides some protein. Each slice contains about 4 grams of protein. While this isn’t a high-protein dessert, it does contribute to your daily intake. Pairing your cake with a protein-rich side, like a scoop of Greek yogurt, can enhance the nutritional value of your dessert.
Sodium
Sodium content is another important factor to consider. Each serving of Ombre Chocolate Cake has around 300 milligrams of sodium. This amount is relatively moderate, especially for a dessert. However, if you’re watching your sodium intake, it’s wise to be mindful of other meals throughout the day to keep your overall consumption in check.
Understanding the nutritional information of your Ombre Chocolate Cake can help you enjoy it guilt-free. Remember, it’s all about balance. Treat yourself to this delightful dessert while keeping an eye on your overall dietary needs!
FAQs about Ombre Chocolate Cake Recipe
How do I achieve the perfect ombre effect?
To achieve the perfect ombre effect, start by dividing your cake batter into three bowls. Use food coloring to tint each bowl a different shade, ranging from dark to light. When pouring the batter into the cake pans, make sure to layer them in order of color. This will create a beautiful gradient when you slice the cake. Additionally, when frosting, use the same color gradient technique. Start with the darkest shade at the bottom and gradually transition to the lightest at the top. This method will enhance the visual appeal of your cake!
Can I make this cake ahead of time?
Absolutely! You can make the Ombre Chocolate Cake ahead of time. In fact, it can be baked a day or two in advance. Just ensure that the cake layers are completely cooled before wrapping them in plastic wrap. Store them at room temperature if you plan to use them within a day. For longer storage, refrigerate the layers. When you’re ready to serve, simply frost and decorate the cake. This makes it a great option for busy days or special occasions!
What are some common mistakes to avoid with this recipe?
There are a few common mistakes to watch out for when making your Ombre Chocolate Cake. First, avoid overmixing the batter, as this can lead to a dense cake. Second, ensure your oven is preheated to the correct temperature before baking. An unheated oven can affect the cake’s rise. Third, let the cake layers cool completely before frosting. If they are warm, the frosting may melt and slide off. Lastly, be careful with food coloring; start with a small amount and gradually add more to avoid overly bright shades.
How should I store leftover Ombre Chocolate Cake?
To store leftover Ombre Chocolate Cake, place it in an airtight container at room temperature for up to three days. If you need to keep it longer, refrigerate it. Just remember to let it come to room temperature before serving for the best flavor and texture. If the cake is frosted, it’s best to keep it covered to prevent the frosting from drying out. Enjoy your delicious cake even after the celebration!
Conclusion on Ombre Chocolate Cake Recipe
In conclusion, the Ombre Chocolate Cake Recipe is not just a dessert; it’s a delightful experience that combines visual appeal with rich flavors. This cake stands out with its beautiful gradient of colors, making it a perfect centerpiece for any occasion. Whether you’re celebrating a birthday, hosting a gathering, or simply treating yourself, this cake is sure to impress.
By following the steps outlined in this recipe, you can create a moist and flavorful cake that will leave your guests asking for seconds. The versatility of this recipe allows you to experiment with different flavors and frostings, ensuring that each cake you make can be unique. Plus, with the tips and variations provided, you can easily customize the cake to suit your preferences.
Remember, baking is all about having fun and expressing your creativity. Don’t be afraid to try new things, whether it’s different color combinations or flavor profiles. The joy of baking comes not only from the final product but also from the process itself. So, gather your ingredients, roll up your sleeves, and get ready to create a stunning Ombre Chocolate Cake that will delight everyone who tastes it!
Happy baking, and enjoy every delicious slice of your beautiful creation!
Ombre Chocolate Cake
Ingredients
Equipment
Method
- Preheat the oven to 350°F (175°C). Grease and flour three 9-inch round cake pans.
- Mix Dry Ingredients: In a large mixing bowl, combine the flour, sugar, cocoa powder, baking powder, baking soda, and salt. Whisk until well blended.
- Add Wet Ingredients: Add the eggs, milk, vegetable oil, and vanilla extract to the dry ingredients. Beat on medium speed for 2 minutes until smooth.
- Add Boiling Water: Carefully stir in the boiling water until fully combined. The batter will be thin.
- Divide and Color: Divide the batter evenly into three bowls. If using food coloring, add a dark shade to the first, a medium shade to the second, and a light shade (or none) to the third bowl.
- Bake Cakes: Pour each colored batter into the prepared cake pans. Bake for 30-35 minutes or until a toothpick inserted in the center comes out clean.
- Cool: Let the cakes cool in the pans for 10 minutes, then turn them out onto wire racks to cool completely.
- Frosting Prep: Combine the chocolate frosting and vanilla frosting to create a single blend (or use them separately for color contrast).
- Assemble: Once cooled, stack the cakes in order of color (darkest on the bottom), spreading a layer of the combined frosting between each layer and on the top and sides of the cake.
- Chill and Serve: Chill the cake for at least 30 minutes to set the frosting before slicing and serving.