

Introduction to Red Velvet Cheesecake Recipe
Red Velvet Cheesecake is a delightful dessert that combines the rich flavors of traditional red velvet cake with the creamy texture of cheesecake. This unique treat is perfect for special occasions or simply to satisfy your sweet tooth. The vibrant red color and velvety texture make it visually appealing, while the combination of flavors creates a delicious experience for your taste buds.
What Makes Red Velvet Cheesecake Unique?
What sets Red Velvet Cheesecake apart from other desserts? First, it features the classic red velvet flavor, which is a blend of cocoa powder and vanilla, giving it a subtle chocolate taste. The addition of cream cheese adds a rich, tangy flavor that perfectly complements the sweetness of the cake. Moreover, the striking red color not only makes it a feast for the eyes but also adds a festive touch to any gathering.
Another unique aspect is the texture. The cheesecake layer is smooth and creamy, while the crust provides a satisfying crunch. This contrast makes each bite enjoyable. Plus, the versatility of this recipe allows for various toppings and variations, making it easy to customize for any occasion.
In summary, Red Velvet Cheesecake is not just a dessert; it’s an experience. Its unique flavor profile, stunning appearance, and delightful texture make it a must-try for anyone who loves sweets. Whether you’re celebrating a birthday, holiday, or just want to treat yourself, this cheesecake is sure to impress!
Ingredients for Red Velvet Cheesecake Recipe
To create a delicious Red Velvet Cheesecake, you’ll need a few key ingredients. Each component plays a vital role in achieving that perfect balance of flavor and texture. Here’s what you’ll need:
- 2 cups graham cracker crumbs: This will form the base of your cheesecake, providing a crunchy texture.
- 1/2 cup unsalted butter, melted: The melted butter helps bind the crumbs together for a sturdy crust.
- 1/4 cup granulated sugar: This adds sweetness to the crust, enhancing its flavor.
- 1 1/2 cups cream cheese, softened: Cream cheese is the star of the cheesecake filling, giving it that rich and creamy texture.
- 1 cup granulated sugar: This sweetens the cheesecake filling, balancing the tanginess of the cream cheese.
- 1 teaspoon vanilla extract: Vanilla adds a warm, aromatic flavor that complements the other ingredients.
- 2 large eggs: Eggs help set the cheesecake, giving it structure and creaminess.
- 1 cup sour cream: Sour cream adds a tangy flavor and contributes to the cheesecake’s smooth texture.
- 1 tablespoon cocoa powder: This gives the cheesecake its subtle chocolate flavor, enhancing the red velvet experience.
- 1 tablespoon red food coloring: The food coloring is essential for achieving that signature red hue.
- 1/2 teaspoon salt: A pinch of salt enhances the overall flavor of the cheesecake.
Gathering these ingredients will set you on the right path to creating a stunning Red Velvet Cheesecake. Each ingredient contributes to the overall taste and texture, making it a delightful treat for any occasion. Now that you have everything you need, let’s move on to the preparation steps!
Step-by-Step Preparation of Red Velvet Cheesecake Recipe
Now that you have all your ingredients ready, it’s time to dive into the step-by-step preparation of your Red Velvet Cheesecake. Each step is crucial to ensure your cheesecake turns out perfectly. Let’s get started!
Step 1: Preparing the Crust
First, you need to prepare the crust. In a medium bowl, combine the graham cracker crumbs, melted butter, and 1/4 cup of granulated sugar. Mix these ingredients until they are well combined. The mixture should resemble wet sand. Next, press this mixture firmly into the bottom of your greased 9-inch springform pan. Make sure it’s even and compact. This will create a sturdy base for your cheesecake. Bake the crust in your preheated oven for 10 minutes. Once done, remove it from the oven and let it cool completely.
Step 2: Making the Red Velvet Batter
While the crust cools, it’s time to make the red velvet batter. In a large mixing bowl, use an electric mixer to beat the softened cream cheese until it’s smooth. Gradually add in 1 cup of granulated sugar, mixing until well combined. Then, add the vanilla extract and mix again. Next, add the eggs one at a time, ensuring each is fully incorporated before adding the next. This helps create a smooth batter. Now, stir in the sour cream, cocoa powder, red food coloring, and salt. Beat the mixture until it’s creamy and well blended. The vibrant red color should be visible at this point!
Step 3: Preparing the Cheesecake Filling
After making the red velvet batter, it’s time to prepare the cheesecake filling. The batter you just created is the filling itself! Ensure it’s smooth and free of lumps. If you notice any lumps, continue mixing until the batter is completely smooth. This step is essential for achieving that creamy texture that cheesecake lovers adore. Once you’re satisfied with the consistency, you’re ready to move on to the next step.
Step 4: Assembling the Red Velvet Cheesecake
Now, it’s time to assemble your cheesecake. Carefully pour the red velvet batter over the cooled crust in the springform pan. Use a spatula to smooth the top, ensuring it’s even. This will help the cheesecake bake uniformly. Make sure to scrape down the sides of the bowl to get every last bit of that delicious batter. Your cheesecake is now ready for the oven!
Step 5: Baking the Cheesecake
Place the assembled cheesecake in the preheated oven. Bake it for 55-60 minutes. You want the center to be set but still slightly jiggly. This is key to a perfect cheesecake texture. Once the baking time is up, turn off the oven but leave the cheesecake inside for an additional hour. This gentle cooling helps prevent cracks from forming on the surface.
Step 6: Cooling and Chilling
After the hour is up, remove the cheesecake from the oven and let it cool to room temperature. This step is important, as it allows the cheesecake to set properly. Once it’s cooled, cover it and refrigerate for at least 4 hours, or overnight if you can wait! Chilling the cheesecake enhances its flavor and texture, making it even more delicious when served.
And there you have it! You’ve successfully prepared your Red Velvet Cheesecake. Each step is designed to ensure that your dessert is not only beautiful but also bursting with flavor. Now, let’s explore some variations you can try!
Variation of Red Velvet Cheesecake Recipe
While the classic Red Velvet Cheesecake is a showstopper on its own, there are several delightful variations you can try. These adaptations cater to different dietary needs and preferences, ensuring everyone can enjoy this delicious dessert. Let’s explore two popular variations: Gluten-Free Red Velvet Cheesecake and Mini Red Velvet Cheesecakes.
Gluten-Free Red Velvet Cheesecake
If you or your guests are following a gluten-free diet, you can easily modify the Red Velvet Cheesecake recipe. To make a gluten-free version, simply substitute the graham cracker crumbs with gluten-free cookie crumbs or almond flour. You can find gluten-free graham crackers at many grocery stores, or you can make your own using gluten-free oats and nuts.
When preparing the crust, mix the gluten-free crumbs with melted butter and sugar just like in the original recipe. Press the mixture into the springform pan and bake as directed. The filling remains the same, so you can enjoy the rich, creamy texture without any gluten worries. This variation allows everyone to indulge in the festive flavors of Red Velvet Cheesecake without compromising their dietary needs!
Mini Red Velvet Cheesecakes
For a fun twist, consider making Mini Red Velvet Cheesecakes! These bite-sized treats are perfect for parties or gatherings. To create mini versions, use a muffin tin lined with cupcake liners instead of a springform pan. Prepare the crust as usual, but divide the graham cracker mixture among the muffin cups, pressing it down firmly.
Next, pour the red velvet batter into each cup, filling them about three-quarters full. Bake the mini cheesecakes for about 20-25 minutes, or until the centers are set but still slightly jiggly. Allow them to cool and chill as you would with the larger cheesecake. Once ready, you can top them with whipped cream and festive sprinkles for an extra special touch!
These mini cheesecakes are not only adorable but also make serving easier. Everyone can grab their own little cheesecake, making them a hit at any event!
Cooking Note for Red Velvet Cheesecake Recipe
When preparing your Red Velvet Cheesecake, there are a few important cooking notes to keep in mind. These tips will help ensure that your cheesecake turns out perfectly every time. Let’s dive into some key points to consider!
First, always use room temperature ingredients. This includes the cream cheese, eggs, and sour cream. Room temperature ingredients blend more easily, resulting in a smoother batter. If you forget to take them out ahead of time, you can place the eggs in warm water for a few minutes and microwave the cream cheese for about 10-15 seconds to soften it.
Next, be careful not to overmix the batter. While it’s important to combine the ingredients well, overmixing can introduce too much air into the batter. This can lead to cracks in your cheesecake as it bakes. Mix just until everything is combined and smooth.
Additionally, consider using a water bath for baking. This method helps maintain a consistent temperature and adds moisture to the oven, reducing the risk of cracks. To create a water bath, wrap the outside of your springform pan with aluminum foil to prevent leaks. Place the pan in a larger baking dish filled with hot water, then bake as directed.
Lastly, patience is key! Allow your cheesecake to cool gradually in the oven after baking. This step helps prevent sudden temperature changes that can cause cracks. Once cooled, refrigerate it for the recommended time to let the flavors meld and the texture set. The longer you chill it, the better it will taste!
By following these cooking notes, you’ll be well on your way to creating a stunning and delicious Red Velvet Cheesecake that will impress your family and friends. Happy baking!
Serving Suggestions for Red Velvet Cheesecake Recipe
Once your Red Velvet Cheesecake is perfectly chilled and ready to serve, it’s time to think about how to present this delightful dessert. The way you serve it can enhance the overall experience, making it even more enjoyable for your guests. Here are some creative serving suggestions to elevate your cheesecake:
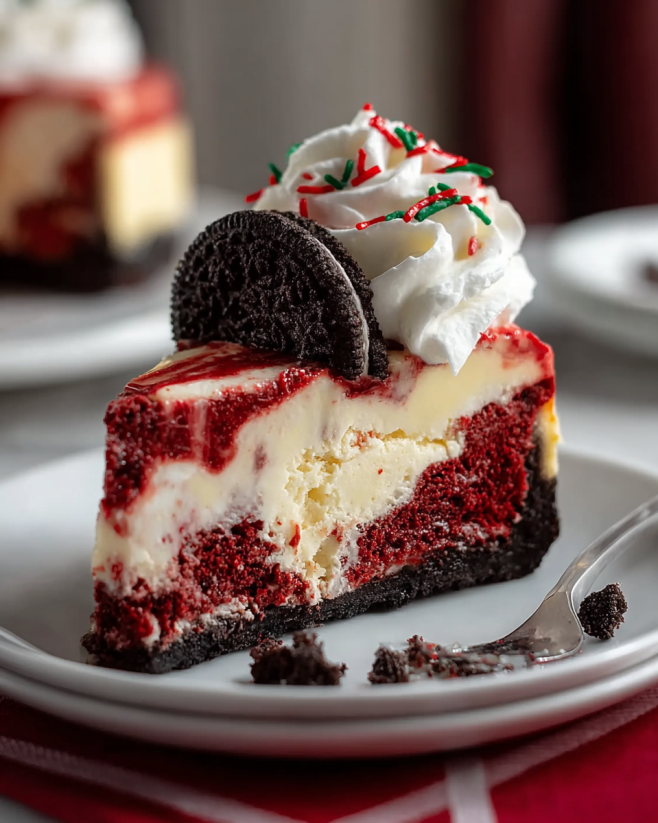
- Whipped Cream Topping: A dollop of freshly whipped cream on top adds a light and airy contrast to the rich cheesecake. You can also pipe it around the edges for a decorative touch.
- Festive Sprinkles: For a fun and colorful presentation, sprinkle red and green sprinkles on top of the whipped cream. This is especially great for holiday gatherings!
- Chocolate Drizzle: Drizzling melted chocolate or chocolate sauce over the cheesecake can add an extra layer of flavor. It pairs beautifully with the red velvet taste.
- Fruit Compote: Serve the cheesecake with a side of raspberry or strawberry compote. The tartness of the fruit complements the sweetness of the cheesecake perfectly.
- Chocolate Shavings: For a touch of elegance, sprinkle chocolate shavings on top. This adds a sophisticated look and a delightful crunch.
- Mini Cheesecake Slices: If you made mini cheesecakes, serve them on a platter with a variety of toppings. This allows guests to choose their favorite flavors!
When serving, consider pairing your Red Velvet Cheesecake with a hot beverage like coffee or tea. The warmth of the drink contrasts nicely with the cool, creamy cheesecake. You can also offer a scoop of vanilla ice cream on the side for an indulgent treat.
Remember, presentation is key! A beautifully served cheesecake not only looks appetizing but also makes the dessert feel special. With these serving suggestions, your Red Velvet Cheesecake will be the star of any gathering!
Tips for Perfecting Your Red Velvet Cheesecake Recipe
Creating the perfect Red Velvet Cheesecake is an art that requires attention to detail. With a few helpful tips, you can elevate your cheesecake to a whole new level. Here are some essential tips to ensure your dessert turns out beautifully every time:
- Use Quality Ingredients: Always opt for high-quality cream cheese and fresh eggs. The better the ingredients, the better the flavor and texture of your cheesecake.
- Don’t Skip the Chilling: Allow your cheesecake to chill for at least 4 hours, or overnight if possible. This step is crucial for achieving the right texture and flavor.
- Check for Doneness: When baking, keep an eye on the cheesecake. It should be set around the edges but still slightly jiggly in the center. This ensures a creamy texture.
- Let It Cool Gradually: After baking, let your cheesecake cool in the oven with the door slightly ajar. This gradual cooling helps prevent cracks from forming.
- Experiment with Flavors: Feel free to add your twist! Consider incorporating spices like cinnamon or nutmeg for added warmth, or even a splash of almond extract for a unique flavor.
- Use a Water Bath: For an ultra-smooth cheesecake, try baking it in a water bath. This method helps maintain moisture and even temperature, reducing the risk of cracks.
- Decorate Thoughtfully: When it comes to presentation, think about how you want to decorate your cheesecake. Simple toppings like whipped cream or fresh berries can make a big impact.
- Practice Patience: Cheesecakes can be finicky, so don’t rush the process. Take your time with each step, and your patience will pay off in the end!
By following these tips, you’ll be well on your way to mastering the art of Red Velvet Cheesecake. Each tip is designed to help you create a dessert that not only looks stunning but also tastes incredible. Happy baking!
Breakdown of Time for Red Velvet Cheesecake Recipe
Understanding the time required for each step of the Red Velvet Cheesecake recipe is essential for planning your baking session. Here’s a detailed breakdown of the time you’ll need to allocate for preparation, cooking, and chilling.
Prep Time
The prep time for your Red Velvet Cheesecake is approximately 30 minutes. This includes gathering all your ingredients, preparing the crust, and mixing the cheesecake batter. Make sure to have everything ready before you start, as this will make the process smoother and more enjoyable.
Cooking Time
Once you’ve prepped your cheesecake, the cooking time is about 55-60 minutes. During this time, the cheesecake will bake in the oven. After baking, it’s crucial to leave the cheesecake in the oven for an additional hour to cool gradually. This step helps prevent cracks and ensures a creamy texture.
Total Time
In total, you should expect to spend around 6 hours and 30 minutes from start to finish. This includes the prep time, cooking time, and the minimum chilling time of 4 hours. If you can, refrigerate the cheesecake overnight for the best flavor and texture. Planning ahead will ensure that your Red Velvet Cheesecake is ready to impress when it’s time to serve!
Nutritional Information for Red Velvet Cheesecake Recipe
Understanding the nutritional content of your Red Velvet Cheesecake is important, especially if you’re mindful of your diet. This delicious dessert can be enjoyed in moderation, and knowing its nutritional values can help you make informed choices. Here’s a breakdown of the key nutritional information per serving:
Calories
Each slice of Red Velvet Cheesecake contains approximately 350 calories. This calorie count includes the rich ingredients like cream cheese and butter, which contribute to its creamy texture and delightful flavor. While it’s a treat, enjoying it in moderation is key to maintaining a balanced diet.
Protein
In terms of protein, each serving provides about 6 grams. The protein mainly comes from the cream cheese and eggs used in the recipe. Protein is essential for building and repairing tissues, making this cheesecake a sweet treat that also offers some nutritional benefits!
Sodium
The sodium content in each slice of Red Velvet Cheesecake is approximately 300 milligrams. This amount is relatively moderate, but if you’re watching your sodium intake, it’s good to be aware. The salt in the recipe enhances the flavors, but you can adjust it slightly if needed.
Overall, while Red Velvet Cheesecake is a delicious indulgence, being aware of its nutritional information can help you enjoy it responsibly. Whether you’re celebrating a special occasion or simply treating yourself, this cheesecake is sure to satisfy your sweet cravings!
FAQs about Red Velvet Cheesecake Recipe
Can I use a different type of cheese for the cheesecake filling?
Yes, you can! While cream cheese is the traditional choice for cheesecake, you can experiment with other types of cheese. Mascarpone cheese is a great alternative, offering a rich and creamy texture. Ricotta cheese can also be used, but it may result in a slightly different texture. Just keep in mind that the flavor may vary, so choose a cheese that complements the red velvet taste.
How do I store leftover Red Velvet Cheesecake?
Storing leftover Red Velvet Cheesecake is easy! First, make sure it’s completely cooled and chilled. Cover the cheesecake with plastic wrap or aluminum foil to keep it fresh. You can also place it in an airtight container. Store it in the refrigerator for up to 5 days. If you want to keep it longer, consider freezing individual slices. Just wrap them tightly and place them in a freezer-safe container. They can last for up to 3 months in the freezer!
Can I make Red Velvet Cheesecake ahead of time?
Absolutely! In fact, making Red Velvet Cheesecake ahead of time is a great idea. It allows the flavors to meld and improves the texture. You can prepare the cheesecake a day or two in advance. Just remember to chill it in the refrigerator for at least 4 hours or overnight before serving. This way, you’ll have a delicious dessert ready to impress your guests without any last-minute stress!
What can I substitute for buttermilk in the recipe?
If you don’t have buttermilk on hand, don’t worry! You can easily make a substitute. Simply mix 1 cup of milk with 1 tablespoon of white vinegar or lemon juice. Let it sit for about 5-10 minutes until it thickens slightly. This mixture will mimic the tangy flavor of buttermilk and work perfectly in your Red Velvet Cheesecake recipe. Alternatively, you can use plain yogurt or sour cream as a substitute, thinning it with a little milk if needed.
Conclusion on Red Velvet Cheesecake Recipe
In conclusion, the Red Velvet Cheesecake is a delightful dessert that beautifully combines the classic flavors of red velvet cake with the creamy richness of cheesecake. This recipe is not only easy to follow but also allows for creativity and personalization. Whether you choose to stick with the traditional version or explore variations like gluten-free options or mini cheesecakes, the result is sure to impress.
As you prepare this stunning dessert, remember the importance of quality ingredients and patience. Each step, from making the crust to chilling the cheesecake, contributes to the final product’s flavor and texture. With the right techniques and a little love, your Red Velvet Cheesecake will be a showstopper at any gathering.
So, gather your ingredients, roll up your sleeves, and embark on this baking adventure. Whether it’s a birthday celebration, a holiday feast, or just a sweet treat for yourself, this cheesecake is bound to bring joy to your table. Enjoy every bite of this luscious dessert, and don’t forget to share it with friends and family. Happy baking!
Red Velvet Cheesecake
Ingredients
Equipment
Method
- Prepare the crust by combining graham cracker crumbs, melted butter, and sugar. Press into a greased 9-inch springform pan and bake for 10 minutes. Let cool.
- Make the red velvet batter by beating cream cheese, adding sugar, vanilla, eggs, sour cream, cocoa powder, red food coloring, and salt until smooth.
- Pour the red velvet batter over the cooled crust and smooth the top. Bake for 55-60 minutes until the center is set but slightly jiggly.
- Turn off the oven and leave the cheesecake inside for an additional hour to cool gradually.
- Let the cheesecake cool to room temperature, then refrigerate for at least 4 hours or overnight.