

Introduction to Cheesy Garlic Chicken Wraps
Cheesy Garlic Chicken Wraps. These wraps are not only packed with flavor, but they also offer a delightful combination of textures. The creamy filling, combined with the crispy tortilla, creates a satisfying bite every time.
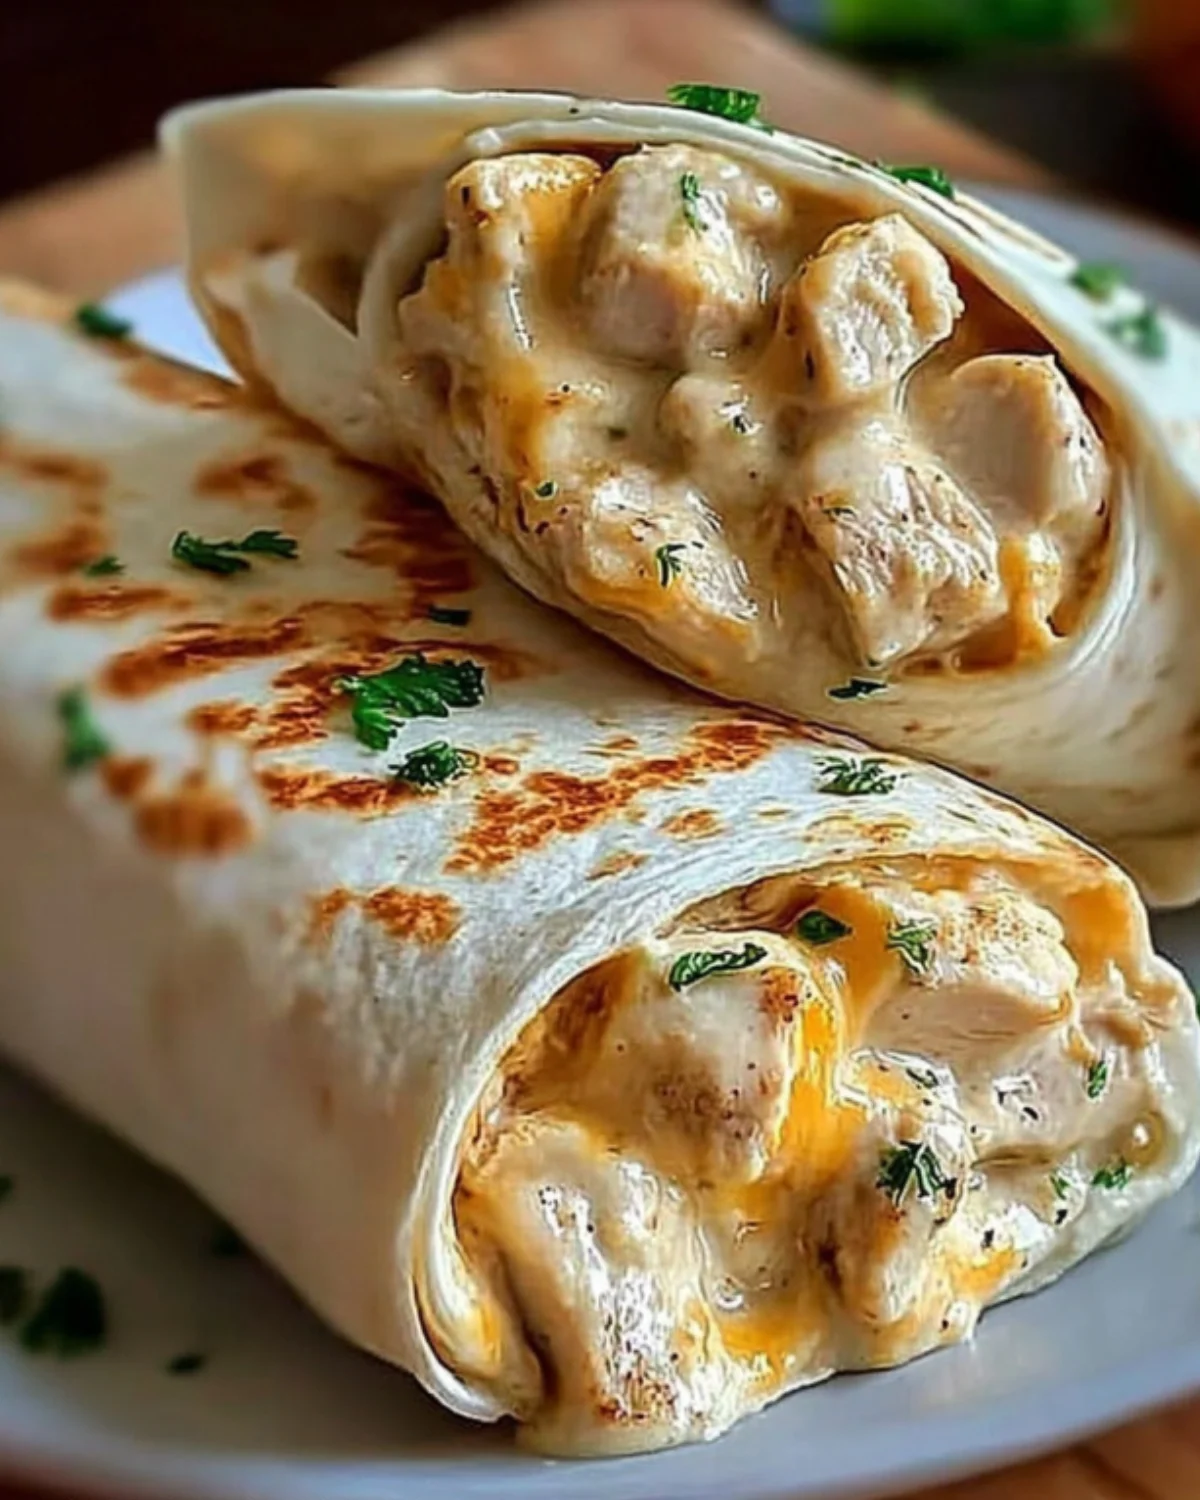
Imagine biting into a warm wrap filled with tender shredded chicken, gooey mozzarella, and a hint of garlic. It’s a comforting dish that can be enjoyed for lunch, dinner, or even as a snack. Plus, they are quick to prepare, making them perfect for busy weeknights.
What makes these wraps even better is their versatility. You can easily customize them to suit your taste. Whether you prefer a little heat or want to add extra veggies, the options are endless. With just a few simple ingredients, you can create a meal that feels special without spending hours in the kitchen.
Cheesy Garlic Chicken Wraps. By the end, you’ll be ready to whip up this tasty dish and impress your family and friends. So, let’s dive in and discover how to make these scrumptious wraps!
Ingredients for Cheesy Garlic Chicken Wraps
Cheesy Garlic Chicken Wraps, you’ll need a handful of simple ingredients. Each component plays a vital role in delivering that rich, creamy flavor and satisfying texture. Here’s what you’ll need:
- 2 cups cooked chicken, shredded
- 1 cup shredded mozzarella cheese
- 1/2 cup cream cheese, softened
- 1/4 cup sour cream
- 3 cloves garlic, minced
- 1 teaspoon Italian seasoning
- 1/2 teaspoon salt
- 1/4 teaspoon black pepper
- 4 large flour tortillas
- 1 cup fresh spinach leaves
- 1/2 cup diced tomatoes
- 1/4 cup sliced green onions
- 1 tablespoon olive oil
These ingredients come together to create a delightful wrap that is both cheesy and garlicky. The shredded chicken provides protein, while the combination of mozzarella and cream cheese adds a creamy richness. The garlic and Italian seasoning bring a burst of flavor, making each bite irresistible.
Feel free to adjust the ingredients based on your preferences. For instance, you can add more veggies or swap out the chicken for another protein. The beauty of these wraps lies in their flexibility, allowing you to make them your own!
Preparation of Cheesy Garlic Chicken Wraps
Cheesy Garlic Chicken Wraps. This process is simple and quick, making it easy for anyone to follow along. Let’s break it down into four easy steps.
Step 1: Preparing the Chicken
First, you need to prepare the chicken. If you haven’t done so already, cook your chicken until it’s tender. You can use leftover chicken or even a rotisserie chicken for convenience. Once cooked, shred the chicken into bite-sized pieces. This will help it mix well with the other ingredients. Set the shredded chicken aside while you move on to the next step.
Step 2: Making the Garlic Sauce
Next, it’s time to make the creamy garlic sauce. In a large mixing bowl, combine the shredded chicken with mozzarella cheese, cream cheese, sour cream, minced garlic, Italian seasoning, salt, and black pepper. Use a spatula or spoon to mix everything together until it’s well combined and creamy. This mixture is the heart of your wraps, so make sure it’s evenly blended for the best flavor!
Step 3: Assembling the Cheesy Garlic Chicken Wraps
Now comes the fun part—assembling your wraps! Lay out the large flour tortillas on a clean surface. Spread an equal amount of the chicken mixture onto each tortilla, leaving about an inch of space around the edges. This will make it easier to roll them up. On top of the chicken mixture, add fresh spinach leaves, diced tomatoes, and sliced green onions. These toppings add freshness and crunch to your wraps.
Step 4: Cooking the Wraps
Finally, it’s time to cook your wraps. Heat olive oil in a large skillet over medium heat. Once the oil is hot, carefully place the wraps seam-side down in the skillet. Cook them for about 3-4 minutes on each side, or until they are golden brown and crispy. This step gives your wraps a delightful crunch while keeping the inside warm and cheesy. Once cooked, remove the wraps from the skillet and let them cool for a minute before slicing them in half. Serve warm and enjoy!
Variation of Cheesy Garlic Chicken Wraps
Cheesy Garlic Chicken Wraps is their versatility. You can easily switch up the ingredients or cooking methods to create a dish that suits your taste. Let’s explore some alternative ingredients and different cooking methods to make these wraps even more exciting!
Alternative Ingredients for Cheesy Garlic Chicken Wraps
If you want to mix things up, consider these alternative ingredients:
- Protein Options: Instead of chicken, try using cooked shrimp, turkey, or even a plant-based protein like tofu or tempeh. Each option brings a unique flavor and texture.
- Cheese Varieties: While mozzarella is delicious, you can experiment with other cheeses. Cheddar, pepper jack, or even feta can add a different twist to your wraps.
- Vegetable Additions: Feel free to add more veggies! Bell peppers, zucchini, or mushrooms can enhance the flavor and nutrition of your wraps.
- Spice It Up: For those who love a little heat, add diced jalapeños or a sprinkle of red pepper flakes to the chicken mixture. This will give your wraps a spicy kick!
Cheesy Garlic Chicken Wraps to fit your dietary needs or personal preferences. The possibilities are endless!
Different Cooking Methods for Cheesy Garlic Chicken Wraps
While pan-frying is a popular method, there are other ways to cook your wraps:
- Baking: Preheat your oven to 375°F (190°C). Place the assembled wraps on a baking sheet and brush them lightly with olive oil. Bake for about 15-20 minutes, or until they are golden brown and crispy.
- Grilling: For a smoky flavor, grill your wraps! Preheat your grill and place the wraps on the grates. Cook for about 3-4 minutes on each side, or until grill marks appear and the wraps are heated through.
- Air Frying: If you have an air fryer, this is a great option! Preheat the air fryer to 375°F (190°C) and cook the wraps for about 8-10 minutes, flipping halfway through for even crispiness.
Cheesy Garlic Chicken Wraps!
Cooking Note for Cheesy Garlic Chicken Wraps
Cheesy Garlic Chicken Wraps, there are a few cooking notes to keep in mind to ensure your wraps turn out perfectly every time. These tips will help you achieve the best flavor and texture, making your meal even more enjoyable.
First, make sure your chicken is cooked thoroughly before shredding. This step is crucial for food safety and ensures that your wraps are delicious. If you’re using leftover chicken or rotisserie chicken, it’s already cooked, so you can skip this step.
Next, when mixing the filling, be sure to blend the ingredients well. A creamy and well-mixed filling will make your wraps more flavorful. If the mixture seems too thick, you can add a splash of milk or chicken broth to loosen it up. This will help it spread easily on the tortillas.
When it comes to assembling the wraps, don’t overfill them. Leaving about an inch of space around the edges will make rolling easier and prevent the filling from spilling out during cooking. A tightly rolled wrap will hold together better and create a more enjoyable eating experience.
As for cooking, keep an eye on the heat. Medium heat is ideal for achieving a golden brown exterior without burning the tortillas. If you notice they are browning too quickly, lower the heat slightly. This will allow the inside to heat through without compromising the outside.
Cheesy Garlic Chicken Wraps warm for the best taste!
Serving Suggestions for Cheesy Garlic Chicken Wraps
Cheesy Garlic Chicken Wraps are cooked to perfection, it’s time to think about how to serve them. The way you present your wraps can elevate the meal and make it even more enjoyable. Here are some delightful serving suggestions to consider:
- With Dipping Sauces: Serve your wraps with a variety of dipping sauces. A creamy ranch or zesty salsa can add an extra layer of flavor. You might also try a garlic aioli or a spicy chipotle sauce for a kick!
- On a Bed of Greens: For a fresh touch, place your wraps on a bed of mixed greens or arugula. This not only adds color but also provides a crunchy contrast to the creamy filling.
- Accompanied by Sides: Pair your wraps with sides like crispy sweet potato fries, a light salad, or even a bowl of soup. These sides complement the wraps and create a well-rounded meal.
- Garnished with Fresh Herbs: Sprinkle some chopped fresh herbs, like parsley or cilantro, on top of the wraps before serving. This adds a pop of color and freshness that enhances the overall presentation.
- As Part of a Platter: For gatherings or parties, consider serving your wraps as part of a larger platter. Include a variety of finger foods, such as veggie sticks, cheese cubes, and crackers. This makes for a fun and interactive meal!
Cheesy Garlic Chicken Wraps. Whether it’s a casual family dinner or a festive gathering, these wraps are sure to impress!
Tips for Perfect Cheesy Garlic Chicken Wraps
Cheesy Garlic Chicken Wraps is all about attention to detail. With a few simple tips, you can elevate your wraps from good to great! Here are some helpful suggestions to ensure your wraps turn out delicious every time:
- Use Fresh Ingredients: Fresh ingredients make a big difference in flavor. Opt for fresh spinach, ripe tomatoes, and high-quality cheese. This will enhance the overall taste of your wraps.
- Don’t Skip the Seasoning: Seasoning is key! Make sure to mix in enough Italian seasoning, salt, and pepper. This will ensure that every bite is packed with flavor.
- Experiment with Cheese: While mozzarella is a classic choice, don’t hesitate to try different cheeses. Mixing mozzarella with cheddar or pepper jack can add a delightful twist to your wraps.
- Keep the Filling Balanced: When assembling your wraps, aim for a good balance of filling. Too much filling can make rolling difficult, while too little can leave your wraps bland. Find the right amount for a satisfying bite!
- Preheat Your Skillet: Make sure your skillet is hot before adding the wraps. This helps achieve that golden, crispy exterior. A well-heated skillet also ensures even cooking.
- Let Them Rest: After cooking, let your wraps rest for a minute before slicing. This allows the filling to set, making them easier to cut and serve.
- Serve Immediately: For the best taste and texture, serve your wraps right after cooking. They are at their peak when warm and crispy!
Cheesy Garlic Chicken Wraps that are not only delicious but also visually appealing. Enjoy the process and have fun experimenting with flavors!
Breakdown of Time for Cheesy Garlic Chicken Wraps
Cheesy Garlic Chicken Wraps, knowing how much time you need can help you plan your meal better. Here’s a simple breakdown of the time required for each step, so you can enjoy these delicious wraps without any stress.
Prep Time
Cheesy Garlic Chicken Wraps is approximately 15-20 minutes. This includes gathering your ingredients, cooking the chicken if needed, and mixing the filling. If you use leftover or rotisserie chicken, you can save even more time!
Cooking Time
Cooking the wraps takes about 8-10 minutes. You’ll need around 3-4 minutes on each side in a skillet to achieve that perfect golden brown and crispy texture. If you choose to bake or grill your wraps, the cooking time may vary slightly, but it generally stays within this range.
Total Time
Cheesy Garlic Chicken Wraps. This quick preparation and cooking time make it an ideal meal for busy weeknights or when you want something tasty without a long wait.
With this time breakdown, you can easily fit these wraps into your schedule. Enjoy the process and the delicious results!
Nutritional Information for Cheesy Garlic Chicken Wraps
Cheesy Garlic Chicken Wraps not only taste great but also provide a good amount of nutrients. Here’s a breakdown of the key nutritional information per serving:
Calories
Cheesy Garlic Chicken Wraps contains approximately 450 calories. This makes it a satisfying meal option that can fit into various dietary plans. The calorie count comes from the combination of chicken, cheese, and other ingredients, providing energy for your day.
Protein
These wraps are a fantastic source of protein, offering about 35 grams per serving. The shredded chicken and cheese contribute significantly to this protein content. Protein is essential for muscle repair and growth, making these wraps a great post-workout meal or a hearty lunch option.
Sodium
Cheesy Garlic Chicken Wraps while keeping your health in check.
Cheesy Garlic Chicken Wraps provide a balanced mix of calories, protein, and sodium, making them a delicious and nutritious choice for any meal. Enjoy them as part of a well-rounded diet!
FAQs about Cheesy Garlic Chicken Wraps
What can I substitute for chicken in Cheesy Garlic Chicken Wraps?
Cheesy Garlic Chicken Wraps. You can use cooked shrimp for a seafood twist, or try turkey for a leaner option. For a vegetarian choice, consider using plant-based proteins like tofu or tempeh. These substitutes will still provide a satisfying and flavorful wrap, allowing you to enjoy the same creamy goodness without the chicken!
Can I make Cheesy Garlic Chicken Wraps ahead of time?
Cheesy Garlic Chicken Wraps ahead of time, making them a great option for meal prep. Simply assemble the wraps, but don’t cook them just yet. Wrap them tightly in plastic wrap or store them in an airtight container in the refrigerator. When you’re ready to eat, just heat them in a skillet or oven until they are warm and crispy. This way, you can enjoy a quick and tasty meal without the hassle of cooking from scratch!
What type of cheese works best in Cheesy Garlic Chicken Wraps?
Cheesy Garlic Chicken Wraps, you can experiment with other types of cheese as well. Cheddar cheese adds a sharp flavor, while pepper jack brings a spicy kick. If you prefer a tangy taste, feta cheese can be a great addition. Mixing different cheeses can create a unique flavor profile, so feel free to get creative and find the combination that you love best!
How do I store leftover Cheesy Garlic Chicken Wraps?
Cheesy Garlic Chicken Wraps is simple! Allow the wraps to cool completely before placing them in an airtight container. You can keep them in the refrigerator for up to 3 days. When you’re ready to enjoy them again, reheat in a skillet over medium heat until warmed through. Alternatively, you can use a microwave, but be aware that this may make the wraps a bit softer. Enjoy your leftovers for a quick and tasty meal!
Conclusion on Cheesy Garlic Chicken Wraps
Cheesy Garlic Chicken Wraps are a delightful and versatile dish that can easily become a favorite in your household. With their creamy filling and crispy exterior, these wraps offer a satisfying meal that is both quick to prepare and full of flavor. Whether you’re enjoying them for lunch, dinner, or as a snack, they are sure to please everyone at the table.
By following the simple steps outlined in this article, you can create your own delicious wraps tailored to your taste. Remember, the beauty of these wraps lies in their adaptability. Feel free to experiment with different proteins, cheeses, and vegetables to make them your own. The options are endless!
Moreover, with the tips and variations provided, you can elevate your cooking experience and impress your family and friends. Whether you choose to bake, grill, or pan-fry your wraps, each method brings a unique twist to this classic dish.
Cheesy Garlic Chicken Wraps is just beginning, and we hope it brings you joy and satisfaction in every bite. Happy cooking!
Cheesy Garlic Chicken Wraps
Ingredients
Equipment
Method
- Prepare the chicken by cooking it until tender and shredding it into bite-sized pieces.
- In a large mixing bowl, combine the shredded chicken with mozzarella cheese, cream cheese, sour cream, minced garlic, Italian seasoning, salt, and black pepper. Mix until well combined and creamy.
- Lay out the large flour tortillas and spread an equal amount of the chicken mixture onto each tortilla, leaving about an inch of space around the edges. Add fresh spinach leaves, diced tomatoes, and sliced green onions on top.
- Heat olive oil in a large skillet over medium heat. Place the wraps seam-side down in the skillet and cook for about 3-4 minutes on each side until golden brown and crispy. Let them cool for a minute before slicing in half.