

Introduction to Dreamy Cherry Snowball Cookies Recipe
Dreamy Cherry Snowball Cookies Recipe. These cookies are not just a feast for the eyes; they are a burst of flavor in every bite. With their soft, buttery texture and the sweet surprise of maraschino cherries, they are perfect for any occasion.
Imagine a cookie that melts in your mouth, leaving behind a hint of cherry and a sprinkle of powdered sugar. Sounds dreamy, right? These cookies are easy to make and require simple ingredients that you might already have at home. Whether you’re baking for a holiday gathering, a birthday party, or just a cozy afternoon snack, these cookies will impress everyone.
Dreamy Cherry Snowball Cookies Recipe even more special is their versatility. You can customize them with different nuts or even add a chocolate twist for those who crave a richer flavor. Plus, they are a great option for gluten-free diets, making them accessible to more people.
So, roll up your sleeves and get ready to create a batch of these delightful cookies. They are sure to become a favorite in your household. Let’s get started on this sweet adventure!
Ingredients for Dreamy Cherry Snowball Cookies Recipe
Dreamy Cherry Snowball Cookies Recipe. Having everything ready will make the process smooth and enjoyable. Here’s what you’ll need:
- 1 cup unsalted butter, softened
- 1/2 cup powdered sugar
- 1 teaspoon vanilla extract
- 2 cups all-purpose flour
- 1/2 cup chopped pecans or walnuts
- 1/2 cup maraschino cherries, drained and chopped
- 1/4 teaspoon salt
- Additional powdered sugar for dusting
These ingredients come together to create a cookie that is both rich and flavorful. The unsalted butter provides a creamy base, while the powdered sugar adds sweetness. The vanilla extract enhances the overall flavor, making each bite a delight.
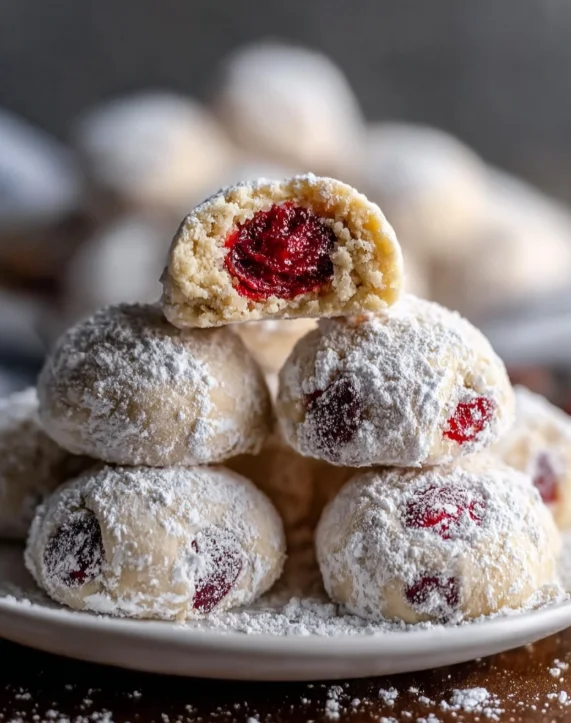
The all-purpose flour gives the cookies their structure, while the chopped nuts add a lovely crunch. The maraschino cherries are the star of the show, bringing a pop of color and sweetness that makes these cookies truly dreamy. Finally, a sprinkle of powdered sugar on top adds a charming finish.
Now that we have our ingredients ready, let’s move on to the next step: preparing the dough. Get excited, because these cookies are just a few steps away!
Step-by-Step Preparation of Dreamy Cherry Snowball Cookies Recipe
Dreamy Cherry Snowball Cookies Recipe. Follow these simple steps, and you’ll have a batch of delicious cookies in no time!
Step 1: Preheat the Oven
First things first, preheat your oven to 350°F (175°C). This step is crucial because it ensures that your cookies bake evenly. While the oven heats up, you can focus on mixing the dough. It’s a great way to save time and keep things moving smoothly!
Step 2: Prepare the Dough
In a large mixing bowl, cream together 1 cup of softened unsalted butter and 1/2 cup of powdered sugar. Use an electric mixer or a whisk to beat them until the mixture is light and fluffy. This process usually takes about 2-3 minutes. Next, add in 1 teaspoon of vanilla extract and mix until well combined. The aroma of vanilla will fill your kitchen, making it feel even more inviting!
Step 3: Incorporate the Cherries
Now, it’s time to add the dry ingredients. Gradually mix in 2 cups of all-purpose flour and 1/4 teaspoon of salt. Stir until just combined; be careful not to overmix. Then, gently fold in 1/2 cup of chopped pecans or walnuts and 1/2 cup of chopped maraschino cherries. Make sure the cherries are well distributed throughout the dough. This step adds a delightful burst of flavor in every bite!
Step 4: Shape the Cookies
Using a tablespoon, scoop out the dough and roll it into small balls, about 1 inch in diameter. Place the cookie balls on a baking sheet lined with parchment paper, spacing them about 2 inches apart. This spacing is important because the cookies will spread a little while baking, and you want them to have enough room to expand without touching each other.
Step 5: Bake the Cookies
Once your cookies are shaped and on the baking sheet, it’s time to bake! Place the baking sheet in the preheated oven and bake for 12-15 minutes. Keep an eye on them; you want the bottoms to be lightly golden. This golden color indicates that they are perfectly baked and ready to come out!
Step 6: Cool and Dust with Sugar
After baking, remove the cookies from the oven and let them cool on the baking sheet for about 5 minutes. This cooling time allows them to set before transferring them to a wire rack. Once they are completely cool, dust the cookies with additional powdered sugar. This final touch not only adds sweetness but also gives them that beautiful snowball appearance!
Dreamy Cherry Snowball Cookies are ready to be enjoyed. They are perfect for sharing with friends and family or savoring all by yourself. Let’s move on to some fun variations you can try!
Variations of Dreamy Cherry Snowball Cookies Recipe
Dreamy Cherry Snowball Cookies Recipe is already a delightful treat, there are many ways to customize it to suit your taste. Let’s explore some fun variations that can add a unique twist to this classic cookie!
Alternative Nuts and Fruits
One of the easiest ways to change up your cookies is by swapping out the nuts and fruits. Instead of using pecans or walnuts, you can try almonds, hazelnuts, or even pistachios. Each nut brings its own flavor and texture, making your cookies even more interesting.
If you want to experiment with fruits, consider using dried cranberries or chopped apricots. These fruits will add a different sweetness and a chewy texture that pairs wonderfully with the buttery cookie base. You can also mix in some chocolate chips for a rich, decadent touch. The combination of chocolate and cherries is always a winner!
Gluten-Free Options
Dreamy Cherry Snowball Cookies Recipe. Simply substitute the all-purpose flour with a gluten-free flour blend. Many blends are available in stores, and they work well in cookie recipes. Just make sure to check the packaging for any specific instructions.
Additionally, you can use almond flour for a nutty flavor and a slightly different texture. This option not only makes the cookies gluten-free but also adds a delightful taste that complements the cherries beautifully. Remember to adjust the amount of flour as needed, since almond flour can behave differently than regular flour.
With these variations, you can create a batch of cookies that suits your preferences or dietary needs. Whether you stick to the classic recipe or try something new, these cookies are sure to be a hit!
Cooking Note for Dreamy Cherry Snowball Cookies Recipe
Dreamy Cherry Snowball Cookies Recipe, a few cooking notes can help ensure your cookies turn out perfectly every time. These tips will guide you through the process and enhance your baking experience.
First, make sure your butter is softened but not melted. Softened butter should be at room temperature, allowing it to cream well with the powdered sugar. This step is crucial for achieving that light and fluffy texture we all love in cookies.
Next, when measuring your flour, use the spoon-and-level method. This means you should spoon the flour into your measuring cup and then level it off with a knife. Avoid scooping directly from the bag, as this can pack the flour and lead to dense cookies.
Also, be mindful of the baking time. Every oven is different, so keep an eye on your cookies as they bake. If you notice they are browning too quickly, you can rotate the baking sheet halfway through the baking time. This ensures even cooking and prevents any burnt edges.
Lastly, let the cookies cool completely before dusting them with powdered sugar. If you dust them while they are still warm, the sugar may melt and create a sticky mess. Waiting until they are cool will give you that beautiful, snowy finish that makes these cookies so appealing.
Dreamy Cherry Snowball Cookies that are not only delicious but also visually stunning. Happy baking!
Serving Suggestions for Dreamy Cherry Snowball Cookies Recipe
Dreamy Cherry Snowball Cookies, it’s time to think about how to serve them! These cookies are not only delicious but also visually appealing, making them perfect for various occasions. Here are some delightful serving suggestions to enhance your cookie experience:
- Cookie Platter: Arrange the cookies on a beautiful platter. You can mix them with other cookies for a colorful cookie assortment. This is perfect for parties or gatherings!
- With a Hot Beverage: Serve your cookies alongside a warm cup of tea, coffee, or hot chocolate. The rich flavors of the cookies pair wonderfully with these drinks, making for a cozy treat.
- As a Dessert Bar: Create a dessert bar at your next event. Include your Dreamy Cherry Snowball Cookies along with other desserts like brownies, cupcakes, and fruit tarts. Guests will love the variety!
- Gift Giving: Package the cookies in a decorative box or jar. Tie it with a ribbon for a lovely homemade gift. They make a thoughtful present for friends, family, or coworkers.
- Ice Cream Sandwiches: For a fun twist, use two cookies to make ice cream sandwiches. Choose your favorite ice cream flavor and scoop it between two cookies. This treat is sure to impress!
Dreamy Cherry Snowball Cookies but also create memorable moments with family and friends. Enjoy sharing these delightful treats!
Tips for Perfecting Your Dreamy Cherry Snowball Cookies Recipe
Dreamy Cherry Snowball Cookies turn out perfectly every time, consider these helpful tips. They will guide you through the baking process and help you achieve the best results.
First, always use fresh ingredients. Check the expiration dates on your baking supplies, especially the baking powder and flour. Fresh ingredients will enhance the flavor and texture of your cookies.
Next, pay attention to the temperature of your ingredients. As mentioned earlier, your butter should be softened but not melted. If you forget to take it out of the fridge, you can cut it into small pieces and let it sit at room temperature for about 15 minutes. This will speed up the softening process.
When mixing the dough, avoid overmixing. Overmixing can lead to tough cookies. Mix until just combined, and then gently fold in the cherries and nuts. This will keep your cookies tender and light.
For an extra touch of flavor, consider adding a pinch of cinnamon or almond extract to the dough. These spices can complement the cherries beautifully and add depth to the overall taste.
Another tip is to chill the dough for about 30 minutes before baking. Chilling helps the cookies maintain their shape and prevents them from spreading too much in the oven. This step is especially useful if your kitchen is warm.
Lastly, remember to rotate your baking sheet halfway through the baking time. This ensures even baking and helps prevent any cookies from browning too quickly on one side. Your cookies will come out perfectly golden and delicious!
Dreamy Cherry Snowball Cookies Recipe. Happy baking, and enjoy every delightful bite!
Breakdown of Time for Dreamy Cherry Snowball Cookies Recipe
Dreamy Cherry Snowball Cookies Recipe can help you plan your baking session better. Here’s a simple breakdown of the time required for preparation and cooking:
Prep Time
The prep time for these delightful cookies is approximately 20 minutes. This includes gathering your ingredients, creaming the butter and sugar, and mixing in the flour, nuts, and cherries. It’s a quick and enjoyable process that allows you to get your kitchen ready for baking!
Cooking Time
Once your dough is ready, the cooking time is about 12-15 minutes. Keep an eye on the cookies as they bake, ensuring they turn a lovely golden color on the bottoms. This short baking time means you won’t have to wait long to enjoy your freshly baked treats!
Total Time
Dreamy Cherry Snowball Cookies in no time, making them perfect for unexpected guests or a sweet craving!
Nutritional Information for Dreamy Cherry Snowball Cookies Recipe
Dreamy Cherry Snowball Cookies Recipe can help you enjoy these treats while keeping track of your dietary needs. Here’s a breakdown of the key nutritional information per serving:
Calories
Each cookie contains approximately 120 calories. This makes them a delightful treat that can fit into a balanced diet. Enjoying one or two cookies can satisfy your sweet tooth without overindulging.
Protein
These cookies provide about 1 gram of protein per serving. While they are not a significant source of protein, the addition of nuts does contribute a small amount. Pairing these cookies with a glass of milk can enhance your protein intake while enjoying a delicious snack!
Sodium
Each cookie has a sodium content of around 50 mg. This is relatively low, making them a suitable option for those watching their sodium intake. However, if you are sensitive to salt, be mindful of the other ingredients you may pair with these cookies.
Dreamy Cherry Snowball Cookies Recipe offers a tasty treat that can be enjoyed in moderation. With their delightful flavors and textures, they are sure to be a hit at any gathering or as a personal indulgence!
FAQs about Dreamy Cherry Snowball Cookies Recipe
Can I use fresh cherries instead of dried?
Dreamy Cherry Snowball Cookies Recipe. However, it’s important to note that fresh cherries have a higher moisture content than maraschino cherries. To use fresh cherries, make sure to pit and chop them finely. You may also want to reduce the amount of butter slightly to prevent the dough from becoming too wet. This way, your cookies will still have that delightful cherry flavor without compromising their texture!
How do I store Dreamy Cherry Snowball Cookies?
Dreamy Cherry Snowball Cookies fresh, store them in an airtight container at room temperature. They can last for about a week. If you want to keep them longer, consider refrigerating them. Just make sure to let them come to room temperature before serving. This will help maintain their soft texture and delicious flavor. If you notice any cookies getting a bit dry, a slice of bread in the container can help keep them moist!
Can I freeze Dreamy Cherry Snowball Cookies?
Dreamy Cherry Snowball Cookies is a great way to enjoy them later. To freeze, place the cooled cookies in a single layer on a baking sheet and freeze until solid. Then, transfer them to a freezer-safe bag or container. They can be stored in the freezer for up to three months. When you’re ready to enjoy them, simply thaw at room temperature or warm them in the oven for a few minutes. They’ll taste just as fresh as the day you baked them!
What can I substitute for powdered sugar?
Dreamy Cherry Snowball Cookies Recipe. Alternatively, you can use coconut sugar or a sugar substitute, but keep in mind that the texture and sweetness may vary. Just ensure that whatever substitute you choose is finely ground to achieve that lovely dusting effect!
Conclusion on Dreamy Cherry Snowball Cookies Recipe
Dreamy Cherry Snowball Cookies Recipe is a delightful addition to any baking repertoire. These cookies are not only easy to make but also offer a wonderful combination of flavors and textures. With their buttery base, sweet maraschino cherries, and a sprinkle of powdered sugar, they are sure to bring smiles to everyone who tries them.
Whether you’re baking for a special occasion or simply treating yourself, these cookies are a fantastic choice. The versatility of the recipe allows you to customize it to your liking, whether you prefer different nuts, fruits, or even a gluten-free version. Each variation adds a unique twist, making it a fun recipe to experiment with.
As you embark on your baking journey, remember the tips and tricks shared throughout this article. They will help you achieve the perfect cookie every time. From ensuring your ingredients are fresh to mastering the baking time, these small details can make a big difference in the final result.
Dreamy Cherry Snowball Cookies that will surely impress. Enjoy the process, share with loved ones, and savor every delicious bite. Happy baking!
Dreamy Cherry Snowball Cookies
Ingredients
Equipment
Method
- Preheat your oven to 350°F (175°C).
- In a large mixing bowl, cream together the softened butter and powdered sugar until light and fluffy, about 2-3 minutes.
- Add in the vanilla extract and mix until well combined.
- Gradually mix in the all-purpose flour and salt until just combined. Then, gently fold in the chopped nuts and maraschino cherries.
- Scoop out the dough and roll it into small balls, about 1 inch in diameter. Place them on a baking sheet lined with parchment paper, spacing them about 2 inches apart.
- Bake for 12-15 minutes until the bottoms are lightly golden.
- Let the cookies cool on the baking sheet for about 5 minutes before transferring them to a wire rack. Dust with additional powdered sugar once completely cool.