

You know that exact moment when your stomach drops, and all you can think about is food? Maybe you just came home from a big game, or maybe you spent hours on a difficult science project. You want something satisfying, warm, and comforting. Something with amazing flavor that you can hold in your hands and devour. You need a meal that delivers on taste but doesn’t require a cleanup disaster. That moment is the perfect time for Cheesy Garlic Chicken Wraps.
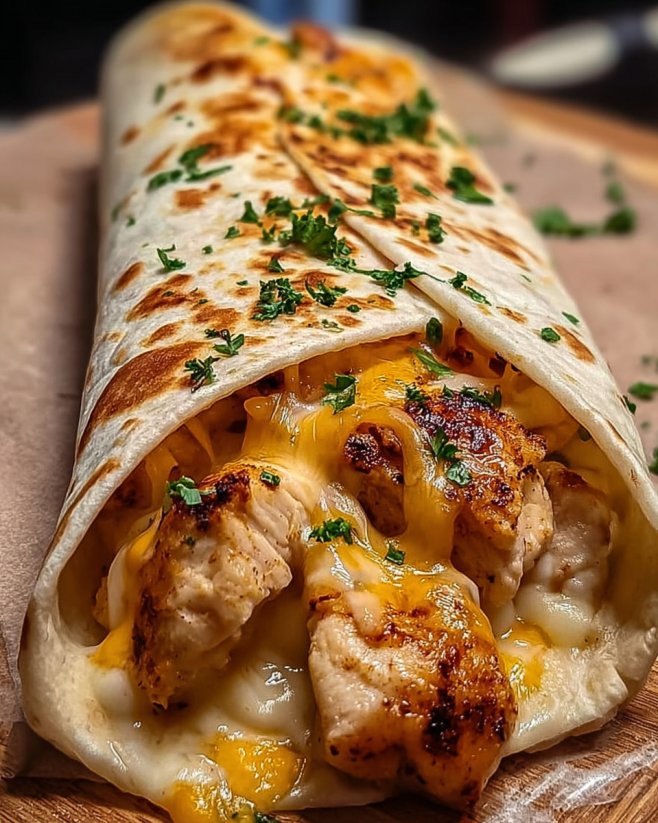
This isn’t just a wrap; it’s a crispy, golden brown package filled with tender chicken, a gooey blend of three cheeses, and a wonderful punch of garlic and Italian herbs. It’s the kind of easy weeknight dinner that will make you feel like a kitchen superhero because it tastes so incredibly rich and delicious, yet it’s surprisingly simple to make. Get ready to learn the secrets to creating this ultimate handheld comfort food that will quickly become a favorite in your household.
The Science of Comfort: Why These Wraps Are So Satisfying
What makes certain foods feel like “comfort food”? It’s usually the combination of soft, warm textures (the melted cheese and tender chicken) and familiar, savory flavors (garlic and herbs). This recipe hits both marks perfectly. When you bite into a hot, crispy Cheesy Garlic Chicken Wrap, you experience a perfect contrast: the crispy outside of the tortilla gives way to the smooth, warm, creamy filling.
The Power of the Cheesy Filling
The filling is the star of this show, thanks to its rich texture. We use three kinds of cheese to achieve gooey perfection:
- Mozzarella Cheese: Known for its amazing stretch and mild, fresh flavor. It’s the cheese that makes the filling gooey.
- Cream Cheese: This is the secret ingredient! Softened cream cheese provides the necessary smooth, creamy base that binds the filling together and makes it so rich.
- Parmesan Cheese: This cheese adds a concentrated, salty, and sharp flavor. You only need a little bit, but it gives the filling a powerful, savory boost.
The Gold Standard: Why a Crispy Wrap Matters
You could simply eat this chicken mixture in a cold tortilla, but the final step—pan-frying it in olive oil—is what elevates this dish to an entirely new level. Cooking the wrap until it’s golden brown and crispy changes the texture, turning the soft flour tortilla into a substantial, crunchy casing. This quick fry also melts the cheese perfectly and warms the shredded chicken, ensuring that first bite is pure comfort. It’s an easy technique that makes a huge difference in the final result.
Your Kitchen Prep: Gathering the Flavor Builders
Even though this is an easy skillet dinner, being organized before you start is key to success. We’re talking about mise en place. Make sure your chicken is ready, your cheeses are measured, and your garlic is minced.
The Prepared Protein: Chicken Prep is Key
The recipe calls for 2 cups of cooked chicken, shredded. This is where you can save a lot of time!
- Rotisserie Chicken: The fastest and easiest route. Just buy a pre-cooked rotisserie chicken from the store and shred the breast meat.
- Meal Prep Chicken: If you cooked chicken earlier in the week, this is the perfect way to use up those leftovers.
- Quick Cook Method: If you’re starting with raw chicken, quickly boil or bake two small chicken breasts until cooked through (internal temperature of 165°F), then shred them using two forks.
Pro Tip for Shredding: If you’re shredding the chicken yourself, try putting the hot, cooked chicken breasts in a bowl and using a hand mixer on low speed. The chicken will shred in seconds!
The Flavor Punch: Garlic and Herb Power
The delicious taste of these Cheesy Garlic Chicken Wraps relies on two strong flavors: garlic and Italian seasoning.
- Fresh Garlic: You need 3 cloves of minced garlic. Don’t be shy with the garlic! It’s one of the main components of the flavor. Mincing it releases its potent oils, which will infuse the entire filling.
- Italian Seasoning: This dried herb blend usually includes basil, oregano, rosemary, and thyme. These herbs give the filling that familiar, warm, savory Italian profile that goes perfectly with the cheese.
The Fresh Elements: Color and Crunch
To make this a balanced meal, we wrap the filling with fresh, vibrant vegetables.
- Fresh Spinach Leaves (1 cup): Spinach adds essential vitamins and a tender, slightly earthy taste. It pairs beautifully with the rich, cheesy filling.
- Diced Tomatoes (1/2 cup): Tomatoes add a burst of juicy freshness and acidity, which cuts through the richness of the cheese. Dice them finely so they mix well and don’t make the tortilla soggy.
Ingredients Breakdown for Cheesy Garlic Chicken Wraps
This table is your quick reference guide for making sure you have all the components for your super-easy, super-delicious meal.
| Component | Ingredient | Quantity | Key Role in the Recipe |
|---|---|---|---|
| Protein | Cooked Chicken | 2 cups | Shredded; provides lean protein. |
| Cheese Blend | Shredded Mozzarella | 1 cup | Provides the gooey, stretchy melt. |
| Cream Cheese (softened) | 1/2 cup | Binds the filling and adds creaminess. | |
| Grated Parmesan Cheese | 1/4 cup | Adds salty, umami depth to the flavor. | |
| Aromatics | Garlic (minced) | 3 cloves | Essential flavor base for the “garlic” taste. |
| Italian Seasoning | 1 teaspoon | Provides the warm, herbal Italian notes. | |
| Seasoning | Salt & Black Pepper | 1/2 tsp & 1/4 tsp | To balance and enhance all the other flavors. |
| Wrapper | Large Flour Tortillas | 4 | The casing; pan-fried to golden brown. |
| Fresh Veggies | Fresh Spinach Leaves | 1 cup | Adds color, fiber, and a fresh texture. |
| Diced Tomatoes | 1/2 cup | Adds juicy acidity to cut through the fat. | |
| Frying | Olive Oil | 1 tablespoon | Used to crisp up the outside of the wrap. |
The Recipe Steps: Building and Crisping Your Perfect Wrap
Follow these steps precisely to go from simple ingredients to a glorious, golden-brown Cheesy Garlic Chicken Wrap.
Step 1: Mixing the Cheesy Filling
In a large bowl, combine the shredded chicken, all three types of cheese (mozzarella, softened cream cheese, and Parmesan), the minced garlic, Italian seasoning, salt, and black pepper.
Now, you need to mix it until everything is perfectly combined. It should look like a thick, sticky, savory paste. If your cream cheese is truly soft (leave it out on the counter for 30 minutes before starting!), this step is easy. Use a sturdy spoon or a spatula. You want the chicken and spices to be evenly distributed throughout the creamy cheese base.
Step 2: Assembling the Wraps (The Folding Technique)
Lay out your 4 large flour tortillas on a clean cutting board or countertop. Divide the chicken mixture evenly into four portions. Spread one portion down the center of each tortilla, leaving about two inches clear on the top and bottom edges. The filling should be in a strip down the middle.
Next, you add the fresh veggies: top the chicken mixture with a handful of fresh spinach leaves and a sprinkle of diced tomatoes.
Step 3: The Tight Roll (Folding and Sealing)
The folding technique is essential to prevent the filling from oozing out when you cook the wraps!
- Fold in the Sides: Take the left and right sides of the tortilla (the shorter edges) and fold them inward over the filling. They should overlap slightly or meet in the middle, covering the ends of the filling.
- Tuck and Roll: Take the bottom edge of the tortilla (the one closest to you) and pull it up tightly over the folded sides and the filling.
- Roll Forward: Continue rolling the tortilla upwards tightly toward the top edge, creating a neat, compact cylinder. The goal is a tightly rolled, solid package. Place the finished wrap seam-side down on your counter.
Step 4: The Golden Brown Finish (The Searing)
Place your largest skillet (non-stick is recommended) over medium heat and add the 1 tablespoon of olive oil. Once the oil is hot and shimmering, carefully place the wraps, seam-side down, into the skillet. You may need to cook them in two batches if they don’t all fit easily without touching.
Cook for 3-4 minutes on the first side. You are looking for a beautiful, deep golden-brown color and a crispy texture. Then, flip the wraps over and cook for an additional 3-4 minutes on the other side. This final cooking is what melts the cheese inside and seals the entire chicken wrap.
Step 5: Cool, Slice, and Serve
Once the wraps are crispy and golden brown on both sides, remove them from the skillet and place them on a cutting board. Let them cool for just one minute. This minute of rest helps the cheese set slightly, so it doesn’t all melt out when you slice them. Use a sharp knife to cut each wrap diagonally in half. Serve them immediately while the cheese is still warm and gooey!
Customizing Your Wraps: Tips and Variations
This Cheesy Garlic Chicken Wrap recipe is a great starting point, but you can easily adapt it to suit your tastes or use up whatever ingredients you have on hand.
Boosting the Protein and Flavor
You can swap out the chicken for other types of protein, which completely changes the flavor profile of this easy weeknight dinner.
- Ground Meat: Cooked ground turkey or beef can be substituted for the shredded chicken. Make sure to drain any excess fat before mixing it with the cheese blend. This is a great way to use leftover taco meat.
- Tuna or Salmon: For a seafood option, use canned tuna or salmon (well drained). The rich fish flavor pairs surprisingly well with the garlic and cream cheese.
- Beans: For a vegetarian version, substitute the chicken with 2 cups of mashed black beans or white kidney beans. Add a dash of chili powder for an extra kick!
Adjusting the Heat Level
The original recipe is mild, perfect for everyone, but if you like spice, here are a few ideas:
- Red Pepper Flakes: Stir a generous sprinkle of red pepper flakes directly into the chicken and cheese mixture in Step 1.
- Diced Jalapeños: For fresh heat, dice up half a small jalapeño (remove the seeds for less heat) and mix it into the filling.
- Hot Sauce Drizzle: Add a dash of sriracha or your favorite hot sauce to the filling, or offer it as a dipping sauce on the side.
Vegetable Power-Ups
You can easily add more vegetables to make this chicken wrap even healthier.
- Sautéed Mushrooms: Before you start the wraps, quickly sauté sliced mushrooms in the skillet and add them to the filling mixture. Mushrooms add a great earthy flavor.
- Diced Onions or Bell Peppers: Finely dice a small amount of onion or red bell pepper and sauté them with the mushrooms, or mix them raw into the filling for extra crunch.
- Pesto: Stir a tablespoon of store-bought pesto into the cheese mixture for an intense, herbaceous flavor boost that complements the Italian seasoning.
Nutritional Compass: Fueling Your Body with Whole Foods
While this dish is rich and cheesy, it is also packed with great nutrition. Understanding the balance of protein, carbs, and fats in these Cheesy Garlic Chicken Wraps helps you see why they are so satisfying and great for your body.
Protein and Fats: The Satiety Factor
With 30g of protein per serving, this meal is fantastic for muscle growth and repair, which is especially important if you are active. The protein comes from the chicken and the high-quality cheese.
The fats (25g per serving) are provided by the cream cheese, mozzarella, and olive oil. These fats are essential for long-lasting energy and helping your body absorb key vitamins (like Vitamin A, D, and E) found in the spinach and tomatoes. This combination of protein and fat is why you feel full and satisfied for hours after eating this easy weeknight dinner.
Carbohydrates and Fiber
The flour tortillas provide the carbohydrates (20g net carbs) needed for quick energy for your brain and muscles. The fresh spinach leaves and tomatoes add valuable fiber, which is important for healthy digestion. By including fresh vegetables, you ensure this comfort food is also a source of essential vitamins.
Nutritional Snapshot for One Serving
This data shows the approximate nutritional breakdown for one serving (1/4 of the total recipe).
| Nutritional Element | Amount (Per Serving) | Benefit in Your Diet |
|---|---|---|
| Calories | 450 | Provides a satisfying amount of energy for dinner. |
| Net Carbs | 20g | Quick energy from the tortilla wrapper. |
| Protein | 30g | Excellent source of protein for muscle repair. |
| Fat | 25g | Provides essential healthy fats from cheeses and olive oil. |
| Servings | 4 | This is a filling and well-portioned meal. |
Troubleshooting and FAQs: Mastering the Wrap Technique
Here are the answers to some common issues and questions you might have when making your Cheesy Garlic Chicken Wraps.
1. Why did the filling ooze out when I was frying the wraps?
This usually happens if the wraps weren’t rolled tightly enough (Step 3) or if you added too much filling. Remember, you must fold in the two short sides first before rolling from the bottom up. This creates a seal on the ends. Also, make sure to place the wraps seam-side down first in the hot oil. The heat will help seal the seam instantly.
2. My tortillas are tearing when I roll them. What can I do?
If your large flour tortillas are cold, they are often stiff and tear easily. The Fix: Place the tortillas on a plate and microwave them for about 10-15 seconds. The light heat will soften the tortilla, making them much more flexible and easy to roll without breaking. Always handle the wraps gently after heating.
3. Can I use store-bought shredded cheese instead of grating my own?
Yes, for this recipe, store-bought shredded mozzarella and Parmesan are perfectly acceptable, since the cream cheese base helps everything melt smoothly. Just make sure the cheese hasn’t been sitting in the fridge too long, as very dry cheese can sometimes affect the melt.
4. Can I bake these Cheesy Garlic Chicken Wraps instead of pan-frying them?
You certainly can! If you want to skip the oil, preheat your oven to 400°F (200°C). Place the rolled wraps on a baking sheet lined with parchment paper. Brush the tops lightly with olive oil or cooking spray. Bake for 10-12 minutes, flipping halfway, until they are golden brown and the cheese is thoroughly melted. This will be slightly less crispy than pan-frying, but still delicious!
5. Can I prepare the chicken filling ahead of time?
Absolutely! This is a great meal prep strategy. You can mix the entire cheesy chicken filling (Step 1) up to two days in advance and store it in an airtight container in the refrigerator. When you’re ready to eat, simply pull out the filling, assemble the wraps with the fresh vegetables, and cook them in the skillet. This cuts the cooking time down to about 10 minutes.
6. I don’t like tomatoes. What’s a good substitution for the fresh diced tomatoes?
If you want a burst of contrasting flavor without the tomatoes, try one of these swaps:
- Diced Pickles or Relish: These add tanginess and crunch, which pairs well with the creamy garlic.
- A Drizzle of Balsamic Glaze: Add a small drizzle of thick balsamic glaze over the filling before rolling. It provides that essential acidic kick to balance the richness.
Final Thoughts on Mastering Quick Skillet Meals
You’ve learned how to create a rich, comforting, and perfectly balanced meal with minimal effort. Mastering these Cheesy Garlic Chicken Wraps teaches you valuable kitchen skills:
- Flavor Layering: You successfully combined bold flavors like garlic, oregano, and three types of cheese.
- Texture Control: You learned the trick of using cream cheese to create a stable, creamy filling, and how to pan-fry for that perfect crispy exterior.
- Efficiency: You created a complete, handheld dinner in a single skillet, proving that easy skillet dinners can be the most delicious ones.
These techniques will make you more confident to tackle other quick meals and use up leftovers in new and exciting ways. This dish is your delicious reminder that the best comfort food is always the food you make yourself!
Your Next Step: An Actionable Challenge
You have the knowledge to create the ultimate comfort food. Now it’s time to head to the kitchen and make these Cheesy Garlic Chicken Wraps your own.
Your Challenge: Try this recipe exactly as written this week to get the technique right. The very next time you make it, challenge yourself to try one of the protein swaps, like ground beef or black beans, to see how the change completely transforms the flavor and texture of your perfect weeknight dinner. Happy cooking!
Cheesy Garlic Chicken Wraps
Ingredients
Equipment
Method
- Shred the cooked chicken into bite-sized pieces and place in a large mixing bowl.
- Add mozzarella cheese, cream cheese, Parmesan cheese, minced garlic, Italian seasoning, salt, and black pepper to the chicken. Mix until well combined.
- Lay out the flour tortillas and divide the chicken mixture evenly among them. Add spinach leaves and diced tomatoes on top.
- Heat olive oil in a skillet over medium heat. Place wraps seam-side down and cook for 3-4 minutes until golden brown. Flip and cook for another 3-4 minutes.